Bringing Mixamo Animations to Life in Godot: Our Manual Import Workflow
Here at 9to5grind.dev, we’re always looking for efficient ways to bring our characters to life. Mixamo is an incredible resource, offering a vast library of free character animations. However, getting those animations onto your specific custom character model in Godot sometimes requires a bit of manual setup, especially if you want fine control over the process.
While plugins exist, understanding the manual import and retargeting process in Godot is super valuable. Today, we’re sharing our step-by-step workflow for manually importing Mixamo animations and retargeting them onto a humanoid character in Godot Engine.
Alternative: Godot Addon
Before we start: It’s worth mentioning that there’s an addon in the Godot AssetLib called addons/mixamo_animation_retargeter designed to automate this process. Unfortunately, it didn’t work reliably for us, which is why we’re detailing the manual approach here. However, it’s definitely an alternative that might be worth trying out!
Prelude: What You’ll Need
- A Mixamo Account: You need to log in to upload your model and download animations. It’s free! Get one at Mixamo.
- Your Character Model (
.fbx): Your model needs a humanoid bone skeleton compatible with Mixamo. You’ll upload this to Mixamo first.
Part 1: Getting the Animation from Mixamo
- Upload Your Model: Head over to Mixamo and upload your character’s
.fbxfile. Make sure it rigs correctly. - Find Your Animation: Browse or search the
Animationstab (e.g., search forIdle,Walk,Jump Attack). Select one you like. - Preview: Mixamo will apply the animation to your uploaded character for a preview. Sweet!
- Download: Happy with the preview? Hit the
Downloadbutton. Use these settings in the dialog:- Format:
FBX(Binary or ASCII works, Binary is common) - Skin:
With Skin(Crucial! This includes the mesh and skeleton, which helps Godot during import, even if you only need the animation data later). - Frames per Second:
30(or match your project’s target) - Keyframe Reduction:
None(usually best to keep all the data) - Click
Download.
- Format:
Part 2: Importing and Preparing the Animation in Godot
-
Import FBX: Drag and drop the downloaded
.fbxfile into your Godot project’s FileSystem dock, preferably into a dedicated folder (e.g.,res://assets/mixamo_imports/). -
Open Import Settings: Double-click the newly imported
.fbxfile in Godot’s FileSystem. This opens the “Advanced Import Settings” window.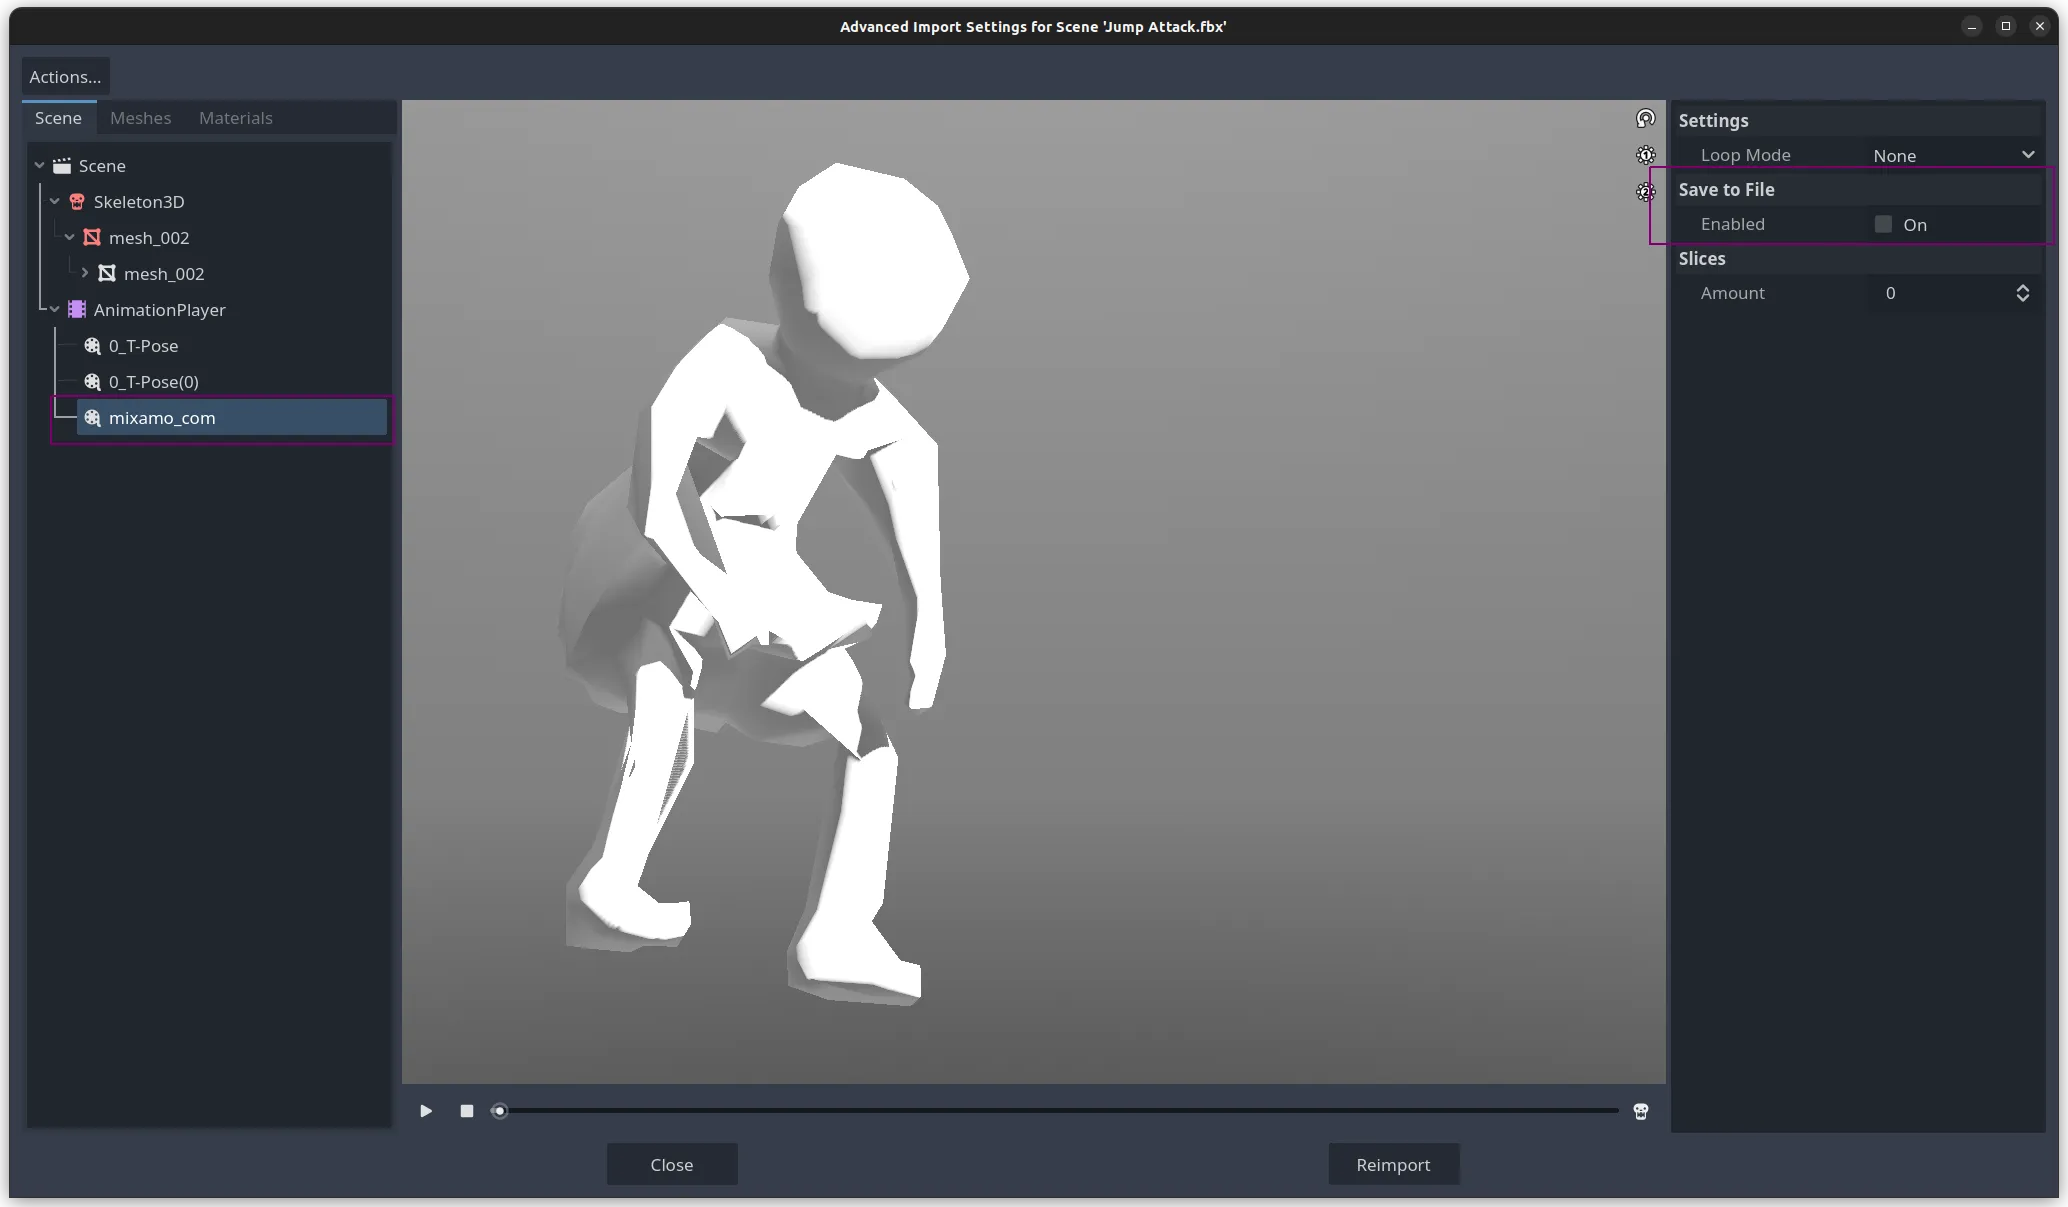
-
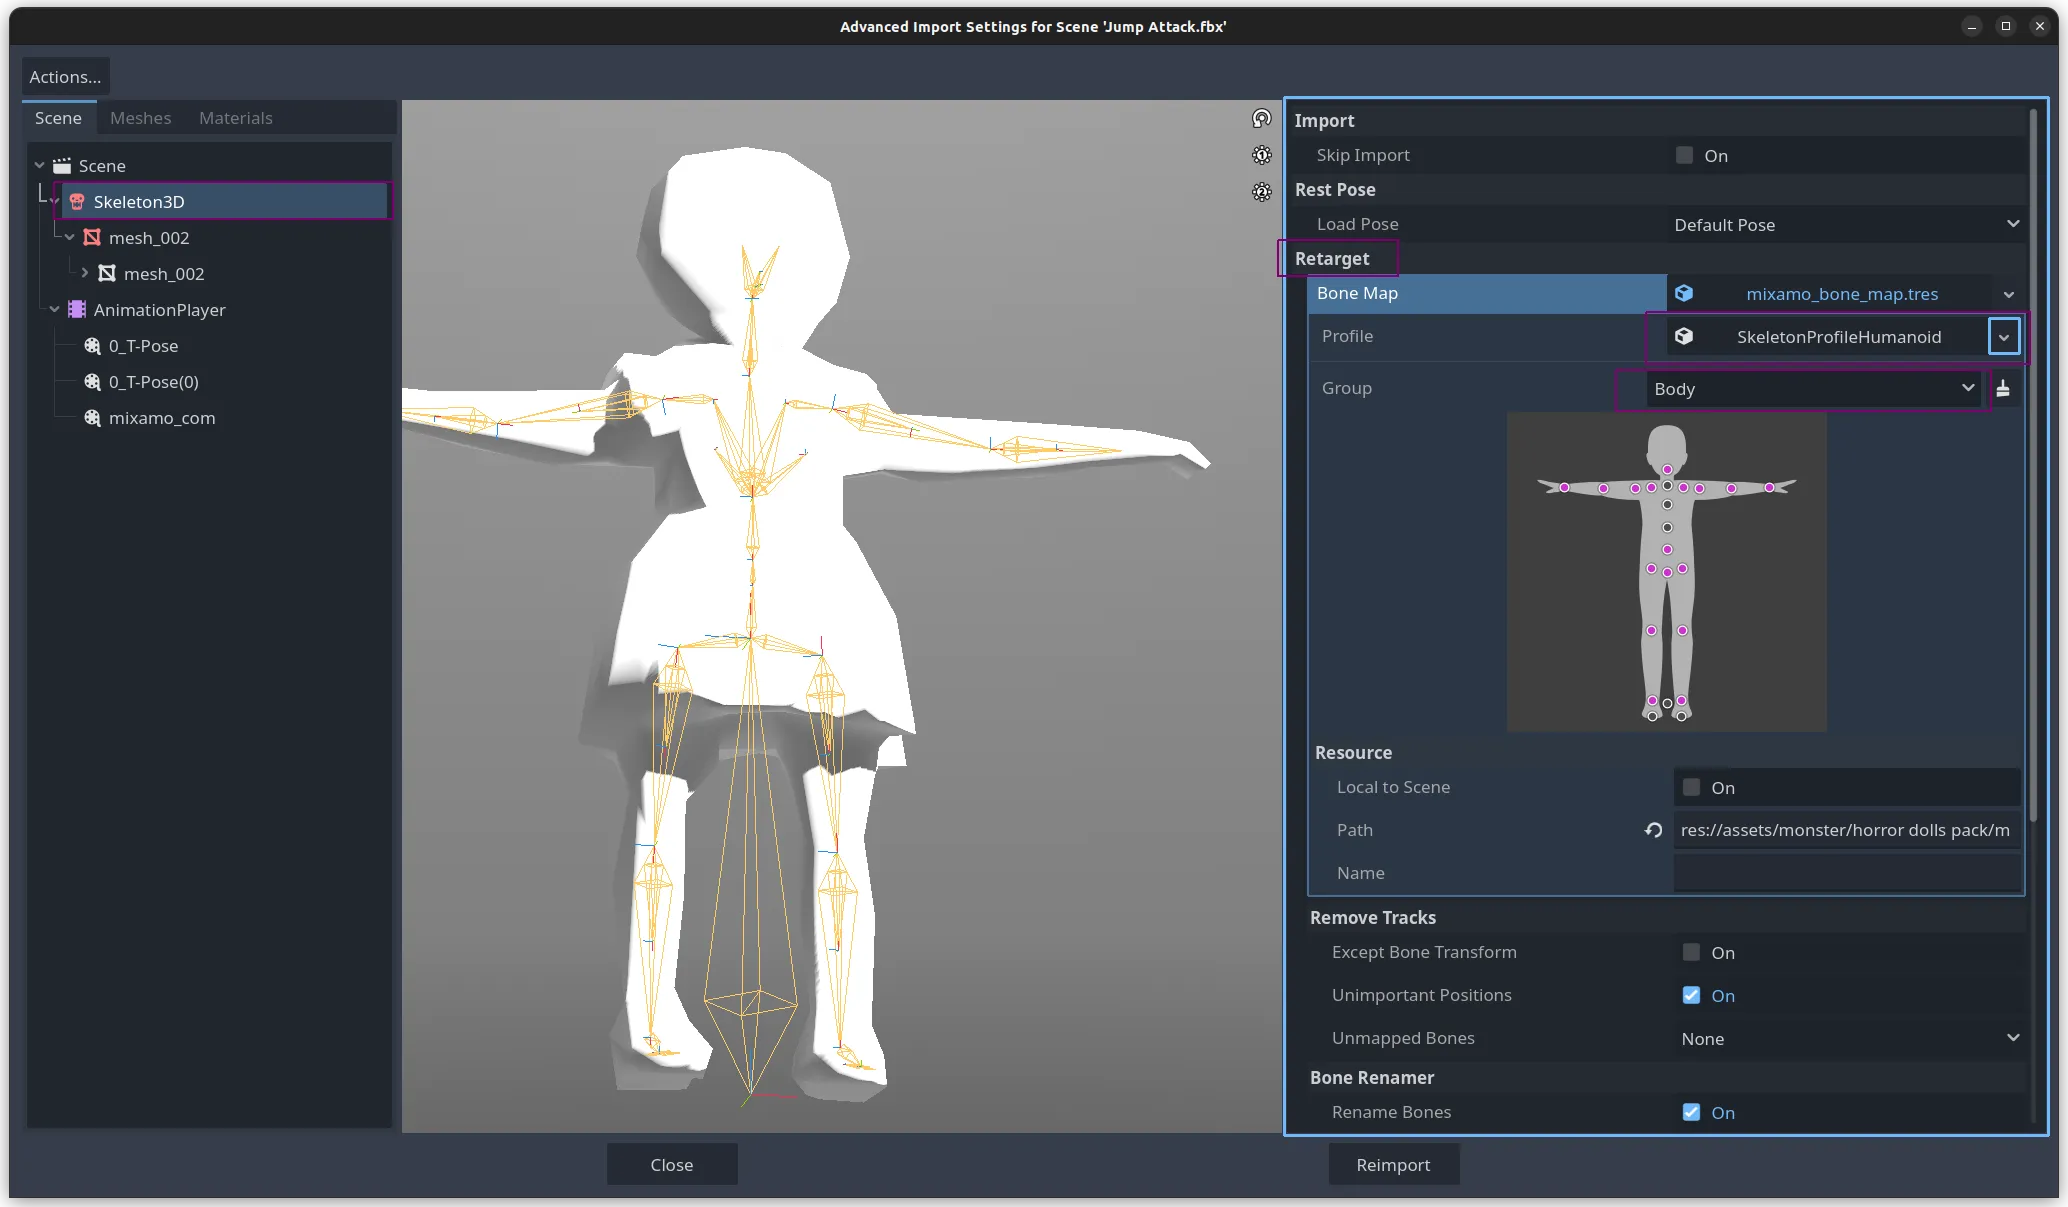
Setup BoneMap for Retargeting:
- Select the
Skeleton3Dnode in the scene tree on the left. - In the Inspector dock on the right, find the
Retargetsection. - Click the dropdown next to
Bone Mapand chooseNew BoneMap. - IMPORTANT: Click the floppy disk icon next to the new BoneMap and
Saveit (e.g.,mixamo_bonemap.tres). You can reuse this BoneMap for all your Mixamo imports for this skeleton type! - Under
Profilewithin the BoneMap resource, selectSkeletonProfileHumanoid. - (Optional but Recommended): Expand the
Bone Mapresource in the inspector and check the bone mappings underGroups(like Body, Head, Legs, Arms) to ensure they correctly match your skeleton’s bone names. Godot does a good job guessing, but verification is key!
- Select the
-
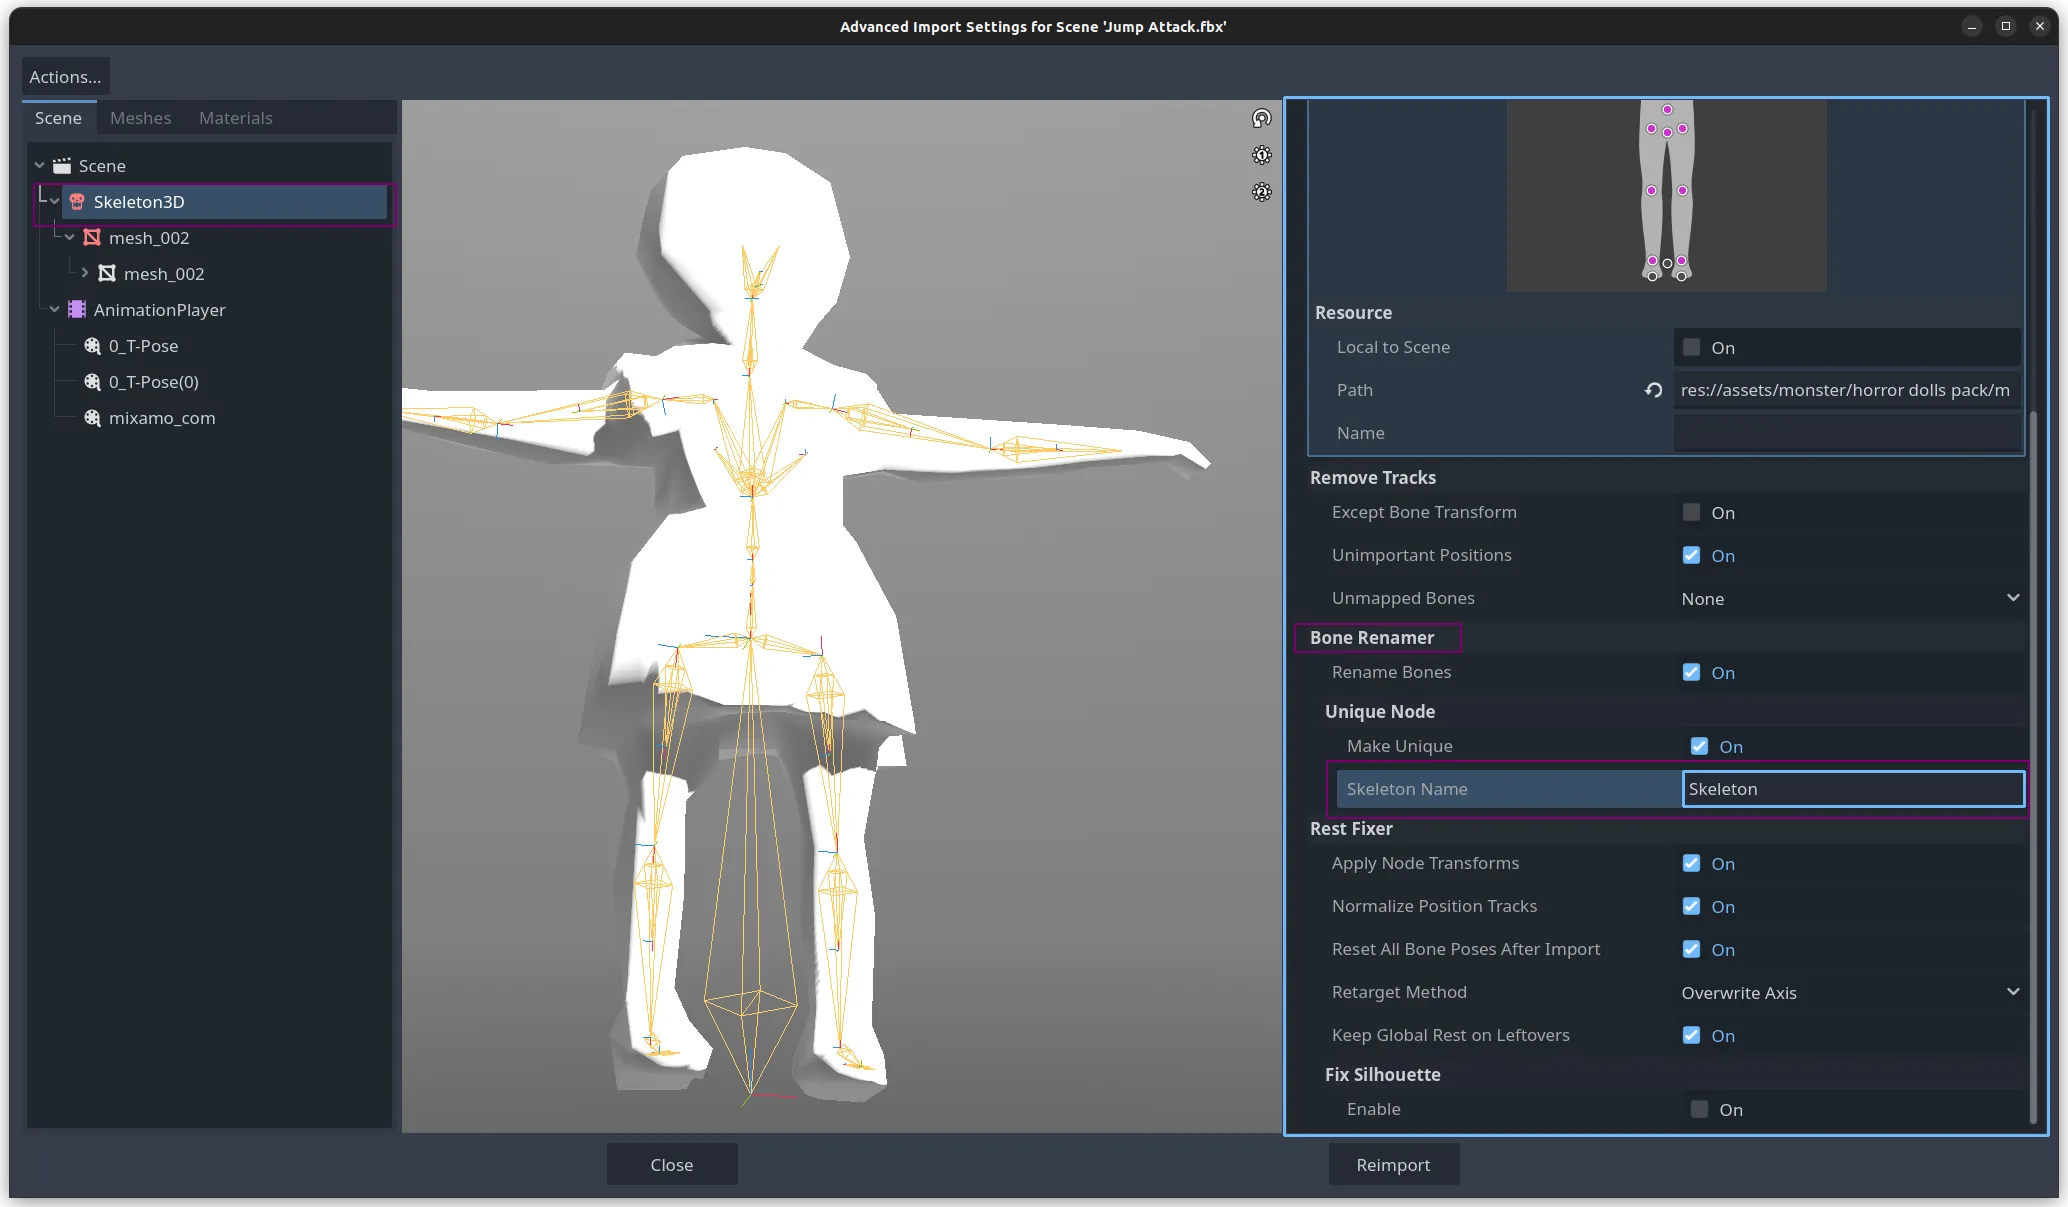
Rename the Skeleton (Crucial for Retargeting):
- Still with the
Skeleton3Dselected, scroll down in the Inspector to theBone Renamersection. - Make sure
Rename Bonesis checked (On). - In the
Skeleton Namefield, enterSkeleton. This needs to match the name of theSkeleton3Dnode in your actual character scene you’ll be applying the animation to later.
- Still with the
-
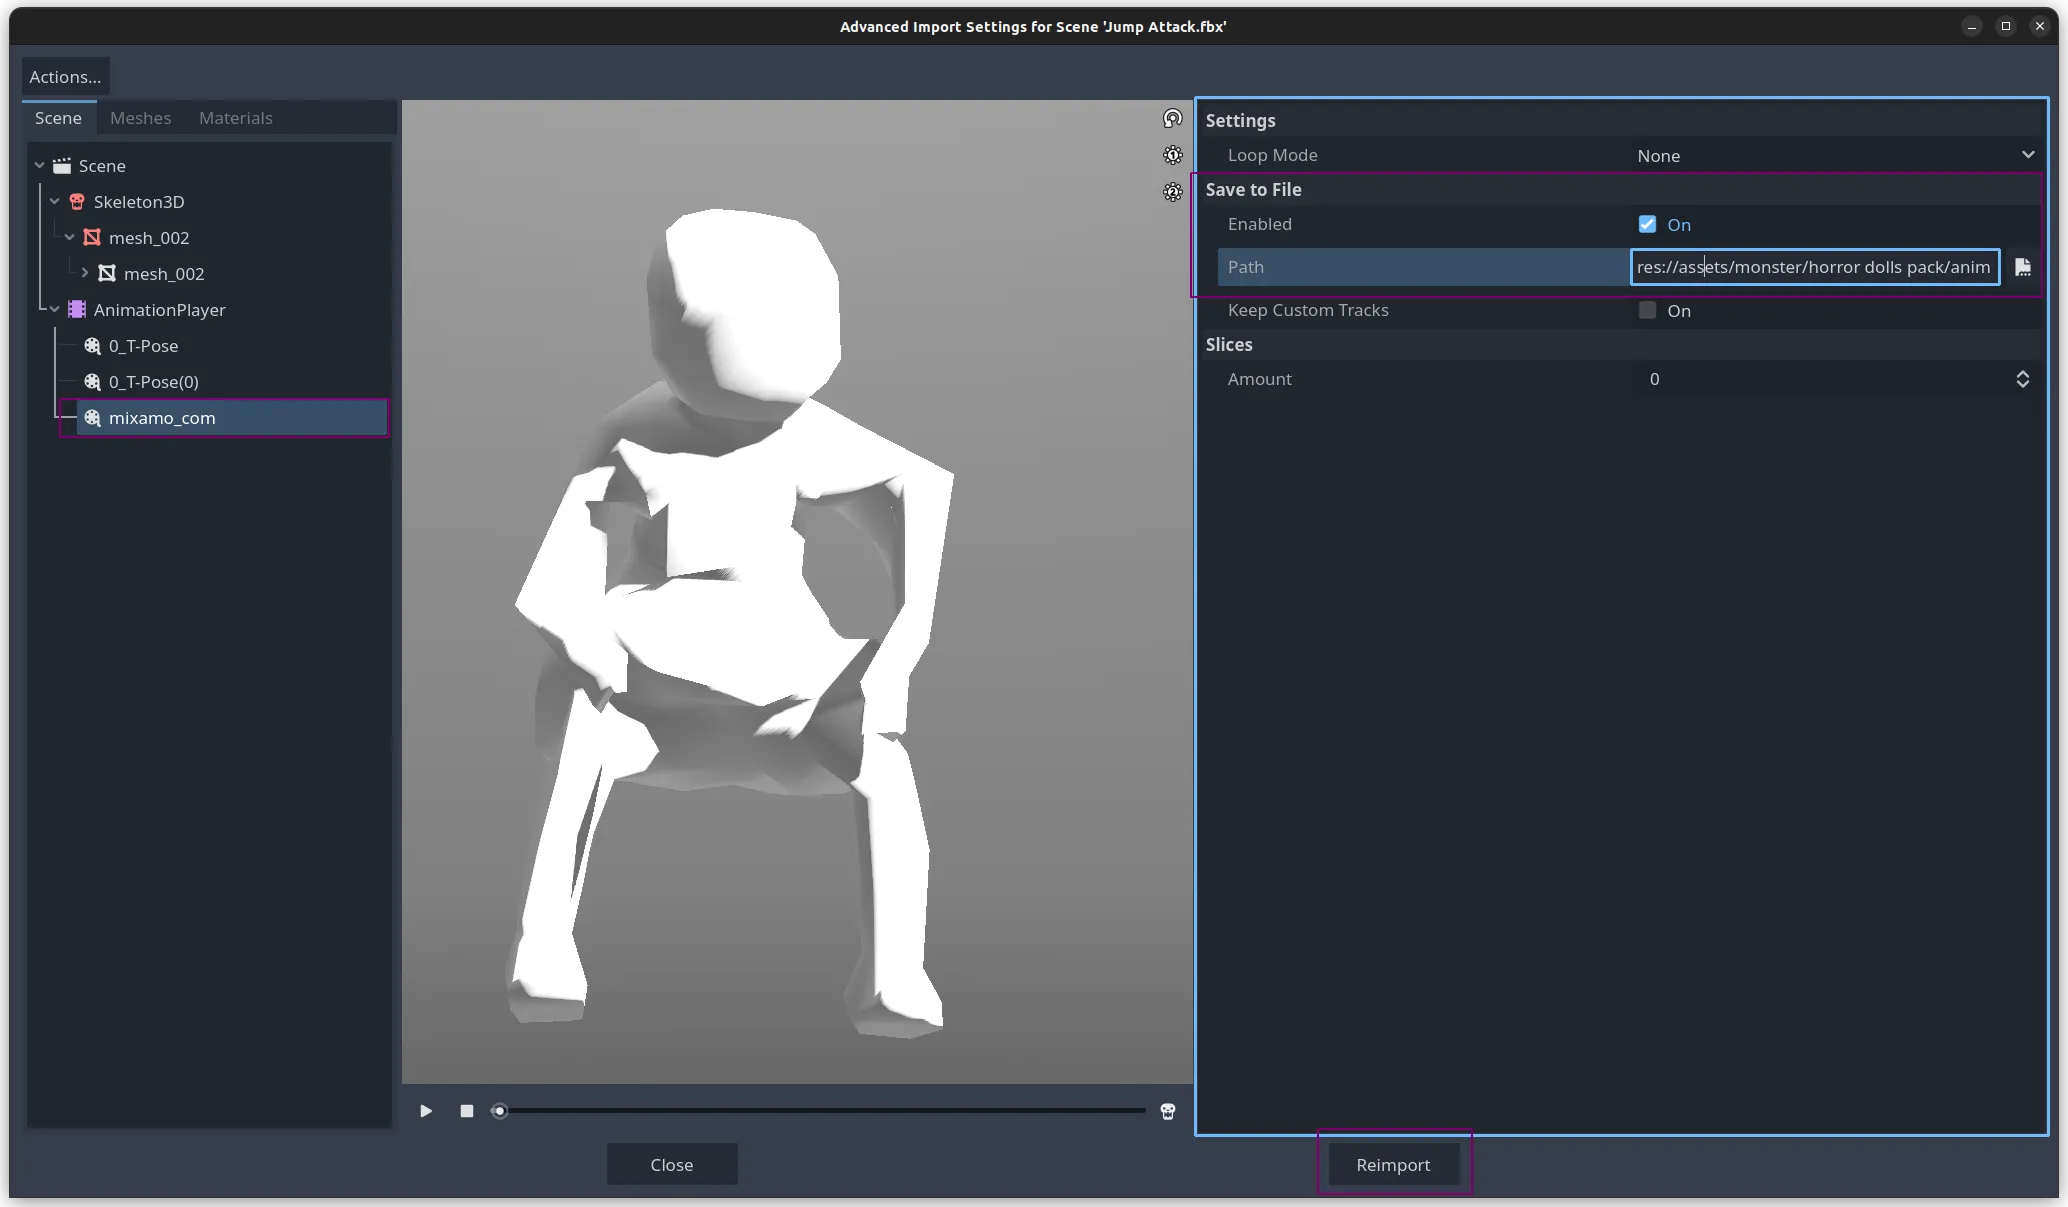
Extract the Animation:
- In the scene tree on the left (inside the import settings window), select the
AnimationPlayernode. - In the Inspector on the right, find the animation named
mixamo_com(or similar default Mixamo name). - Expand the
Save to Filesection for that animation. - Check the
Enabledbox (On). - Click the folder icon next to
Pathand choose a location and filename for the extracted animation resource (e.g.,res://assets/animations/jump_attack.res). This.resfile is the clean animation data we need.
(Reference image similar to the one showing the File Dialog shows the general layout where these settings are found)

- In the scene tree on the left (inside the import settings window), select the
-
Reimport: Once all settings (BoneMap, Bone Renamer, Save to File) are configured, click the
Reimportbutton at the bottom of the import settings window. -
Check the Result: If successful, you should now find your named animation file (
.res) in the folder you specified in step 5.
Part 3: Adding the Animation to Your Character’s AnimationPlayer
Now, let’s add that extracted animation to your actual character scene.
-
Create Inherited Scene: Find your original character model
.fbxin Godot (the one you uploaded to Mixamo). Right-click it and selectNew Inherited Scene. Save this new scene (.tscn) somewhere sensible (e.g.,res://scenes/player.tscn). Working with inherited scenes is good practice. -
Open Your Character Scene: Open the
.tscnfile you just saved. -
Access Animation Management: Select the
AnimationPlayernode within your character scene. In the bottom panel (Animation editor), click theAnimationbutton, then selectManage Animations....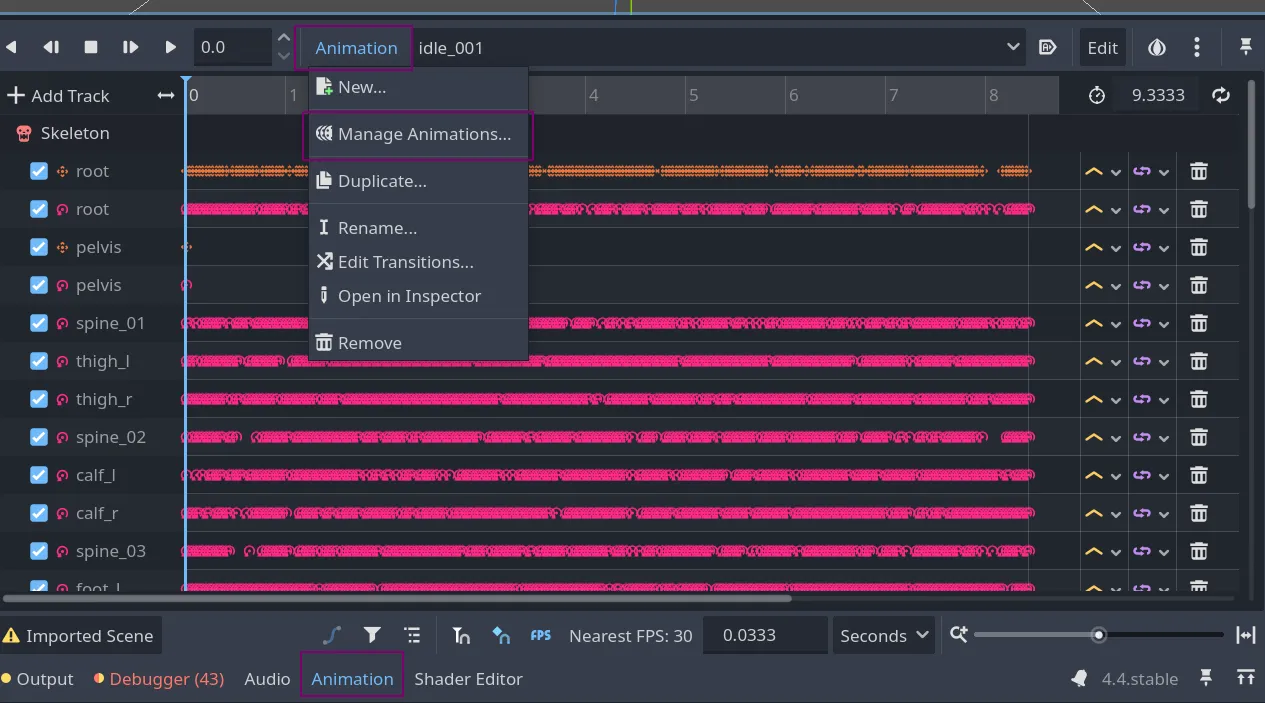
-
Setup Animation Library:
- The “Edit Animation Libraries” dialog appears. You’ll likely see a
[Global]library or one inherited from the FBX. - Click on the library name (e.g.,
[Global]). - On the right side, click the small
Diskicon. ChooseMake Uniquefirst, then click theDiskicon again and selectSave As.... - Save this library as a
.tresfile (e.g.,res://assets/animations/player_animations.tres). This makes your animation set reusable and independent of the original FBX import.
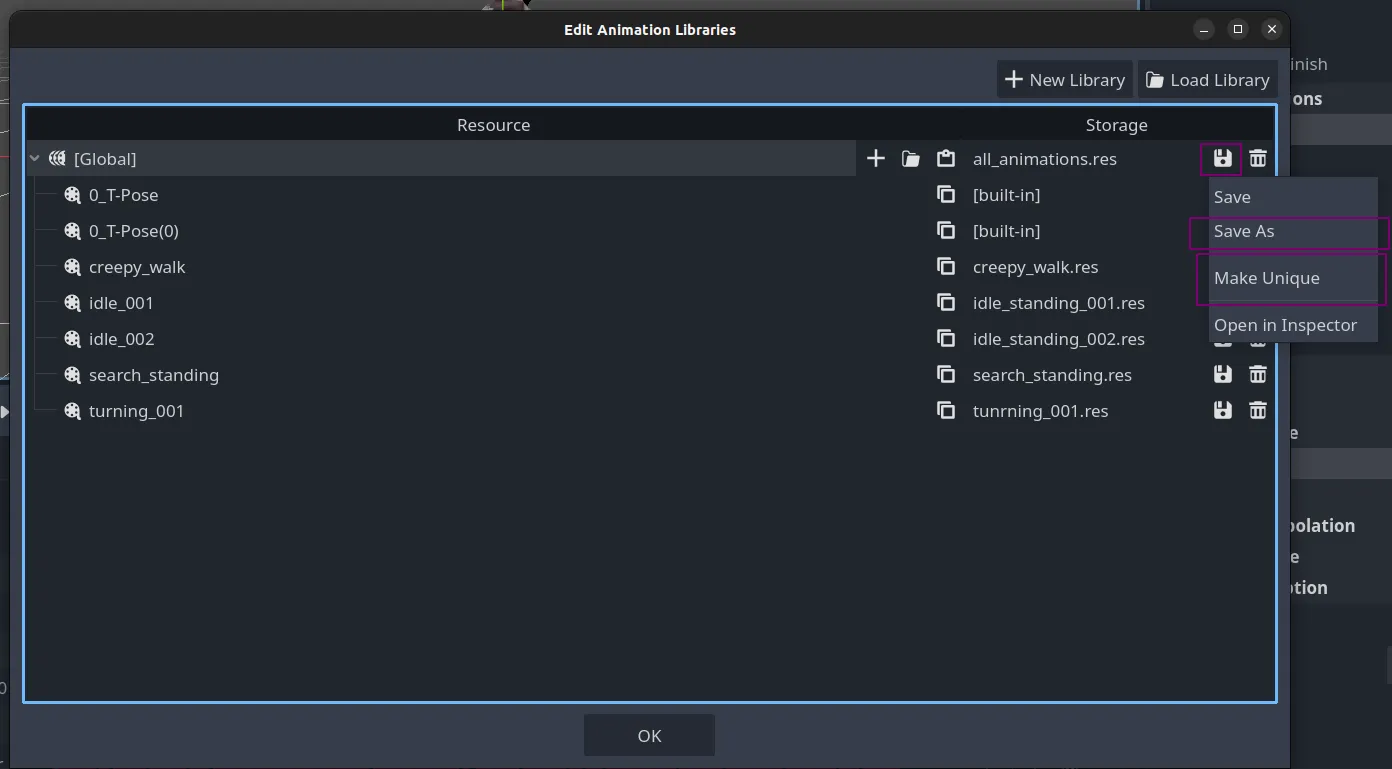
- The “Edit Animation Libraries” dialog appears. You’ll likely see a
-
Load Your Animation: In the same “Edit Animation Libraries” dialog, with your newly saved library selected, click the
Open Folder(or “Load Animation”) icon. Navigate to and select the.resanimation file you extracted in Part 2 (e.g.,jump_attack.res). ClickOpen.(Reference image godot_mixamo_import_007 shows the File Dialog for loading)
-
Confirm: The animation should now appear in the list within your animation library in the dialog. Click
OKto close the dialog. -
Test It! Back in the Animation editor panel, click the animation dropdown list. Your newly imported animation (e.g.,
jump_attack) should be there! Select it and press Play to see it on your character.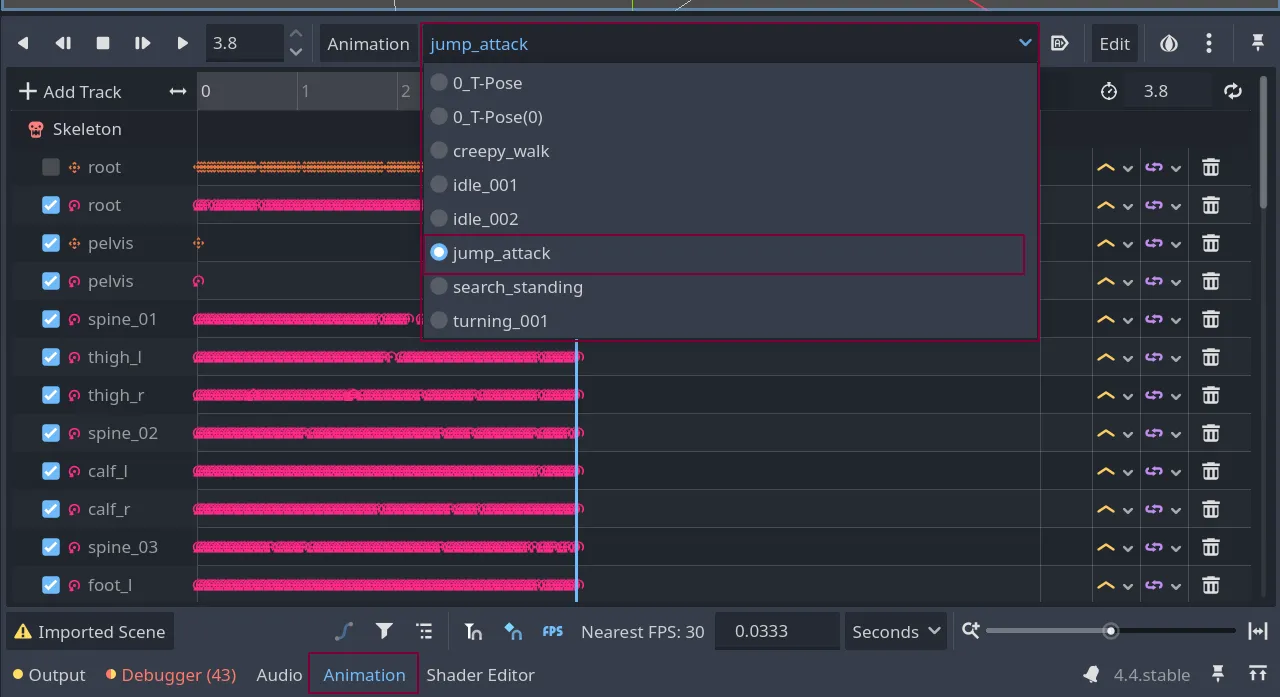
Success!
Congratulations! You’ve successfully imported a Mixamo animation manually and added it to your character’s AnimationPlayer in Godot. Repeat the process (starting from downloading a new animation, but reusing the BoneMap!) for all the animations you need.
This manual process gives you full control and helps you understand how Godot handles animation retargeting. It might seem like a few extra steps compared to plugins, but mastering it is a great skill for any Godot developer working with external animation sources.
Got questions or your own tips for this workflow? Share them in the comments below!
Happy Gamedev! - The 9to5grind.dev Team